How To Choose A Wetsuit The Right Way
Looking for how to choose a wetsuit? Wetsuits are important gear for water sports enthusiasts. Choosing the right wetsuit is not only about size and color but also about fit, function and water conditions you will face.
Whether you are surfing, triathlon, paddling or swimming, how to choose a wetsuit is something you should know. When you choose the right wetsuit, it optimizes your performance and safety in the water, while also allowing for optimal mobility.
So, if you are looking for an answer to how to choose a wetsuit the right way, look no further because we are going to answer every question you have on this topic. Let’s get started so you can feel confident to choose the right wetsuit.
How To Choose A Wetsuit The Right Way
When it comes to how to choose a wetsuit, several factors come into play. If you fail to consider the factors, choosing the right one may become a hassle. Here are the factors that contribute how to choose a wetsuit the right way:
1. The Water Temperature And Wetsuit Thickness
The water temperature and wetsuit thickness are two factors that determine the type of wetsuit to choose. The wetsuit thickness you need for warm water is different from the one you need for cold water. Take a look at the following table:
| Water Temp (°F) | Water Temp (°C) | Recommended Wetsuit Type | Seal Type |
| >72 | >22 | Rashguard (Sun protection) | N/A |
| 65° – 75° | 18° – 24° | Springsuit / Shorty (Thin & flexible) | Flatlock (Basic) |
| 62° – 68° | 16° – 20° | Springsuit / Full Suit (2mm – 3mm) | Flatlock |
| 58° – 63° | 14° – 17° | Full Suit (3/2mm – 4/3mm) + Boots | Sealed (Minimizes water entry) |
| 52° – 58° | 11° – 14° | Full Suit (4/3mm – 5/4/3mm) + Boots + Gloves + Hood | Sealed & Taped (Maximum warmth) |
| 43° – 52° | 6° – 11° | Full Suit (5/4mm – 5/4/3mm) + Boots + Gloves + Hood | Sealed & Taped |
| 42° and below | 6° and below | Full Suit (6/5mm+) + Boots + Gloves + Hood | Sealed & Taped |
UK/ US Wetsuit Thickness Guide By Month
| Month (UK) | Recommended Wetsuit Thickness |
| December – February | Full Suit (6/5mm+) + Boots + Gloves + Hood (Sealed & Taped) |
| March – April | Check water temperature specifically – Cold weather gear might be needed. |
| April – May | Check water temperature specifically – A springsuit or wetsuit might be needed. |
| May – June | Check water temperature specifically – A springsuit or wetsuit might be needed. |
| June – July | Rashguard (Sun protection) |
| July – August | Springsuit / Shorty (Thin & flexible) |
| August – September | Springsuit / Full Suit (2mm – 3mm) |
| September – October | Full Suit (3/2mm – 4/3mm) + Boots (Optional) |
| October – November | Full Suit (4/3mm – 5/4/3mm) + Boots + Gloves + Hood (Sealed) |
| November | Full Suit (5/4mm – 5/4/3mm) + Boots + Gloves + Hood (Sealed & Taped) |
2. Wetsuit Sizing And Fit
Sizing and fit are important when selecting the right wetsuit. Your wetsuit should fit snugly like the second skin and not restricting or uncomfortable. It should not be oversized, or else you will not get the right warmth when you are in the water. So, how do you measure yourself for a good fit:
- Measure your height by standing straight against a wall. Have your friend hold a book flat on your head and then measure the distance from the floor to where the book is. Then use a tape rule and take the measurement.
- Measure your chest with a tape rule. Wrap the tape measure around the fullest part of your chest, just under your armpits. Breathe normally and take the average between inhale and exhale.
- Weigh your weight with a scale and record it
- Measure your waist. Find the narrowest part of your torso, between your lowest rib and hip bone (usually around your belly button). Wrap the tape measure snugly but comfortably.
- If you are a woman, measure your hips. Measure around the fullest part of your hips and buttocks.
Manufacturer size charts may not be the same, so you need to get the sizing right. Once you receive your wetsuit, but here is the next thing to do:
- Snug, But Not Suffocating: The wetsuit should fit like a second skin. You should be able to move freely, but it shouldn’t be baggy. A loose suit lets water flush in, defeating the purpose of warmth.
- No Pinch Points: The suit shouldn’t pinch at your shoulders, neck, or behind your knees.
- Zip Test: The zipper should close comfortably without bulging.
- Lifting Test: Raise your arms overhead. The sleeves shouldn’t bunch up at your shoulders.
3. Wetsuit Entry System
Wetsuits come with different entries. Some have their zip in front, others in the back while some don’t have zip at all. Check the chart below.
| Zipper Type | Description | Pros | Cons |
| Back Zip | The back zipper runs vertically down the spine, typically from the upper back to just above the waist. | – Easiest to put on and take off. – Commonly found and generally less expensive. – Offers a larger opening for entry. | – Can allow more water entry compared to other types. – Zipper placement might restrict flexibility, especially on the back and shoulders. – Some find the zipper uncomfortable when lying on a surfboard. |
| Chest Zip | The chest zipper is located across the chest, requiring you to enter through the neck opening, stretching the suit to step into it. | – Better seal against water entry. – Increased flexibility and range of motion in the back. – Less likely to cause discomfort when lying on a surfboard. | – More challenging to put on and take off. – Usually more expensive due to additional design complexity. – Can feel tighter and more restrictive around the chest and neck. |
| No Zip | These suits eliminate zippers, relying on the stretchability of the neoprene to enter through a stretchable opening. | – Maximum flexibility with no restrictions from zippers. – Minimal water entry, providing better warmth retention. – Streamlined design enhances hydrodynamics. | – Can be very difficult to put on and take off. – Typically the most expensive due to advanced materials. – May wear out faster from the stress of stretching. |
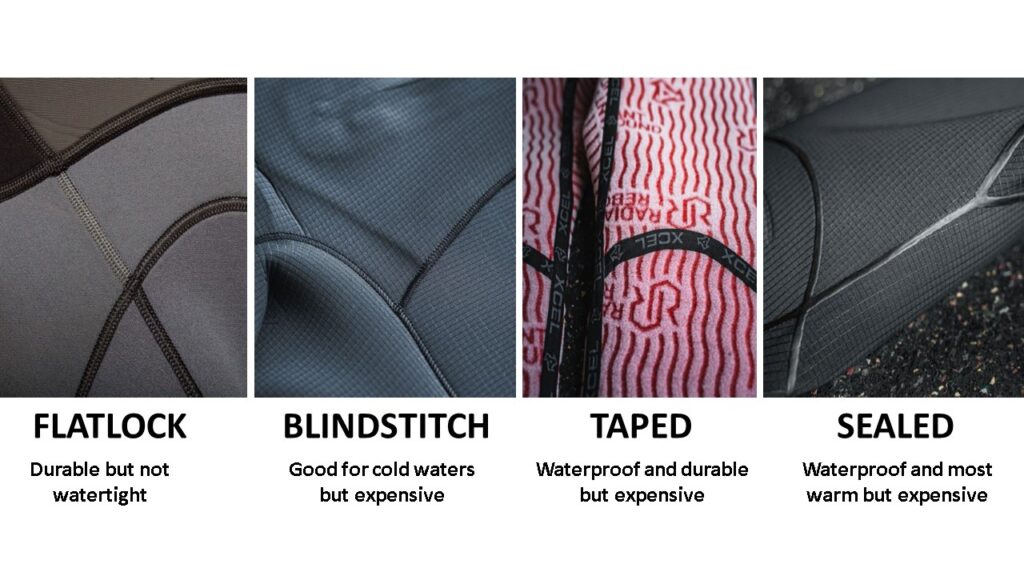
4. Seams
While the thickness and zip of a wetsuit are important, the type of seam is equally important because it is the seam that limits the amount of water that enters the suit.
| Seam Type | Description | Pros | Cons |
| Flatlock | The stitching goes all the way through both layers of neoprene. The seam is flat and visible on both sides. | – Comfortable and flexible. – Durable. – Good for warmer waters. | – Not watertight. – Less suitable for cold water. |
| Blindstitch | Stitches do not go all the way through the neoprene. Instead, the material is glued first and then stitched, which only penetrates partially. | – Waterproof seams. – Flexible. – Good for colder waters. | – More expensive. – Can be less durable than flatlock. |
| Taped Seams | Features a neoprene tape glued over the inside of the seam for extra waterproofing and strength. | – Very waterproof. – Adds durability to seams. – Warm. | – Can feel less flexible. – Increases cost. |
| Sealed Seams | Seams are first glued and then stitched like blindstitch but also include an additional liquid rubber sealant over the seams. | – Maximum warmth retention. – Highly waterproof. – Very durable. | – Least flexible. – Most expensive. |
5. Additional features
Depending on the coldness of the water you are entering, additional features may be necessary. You may need features like knee pads and thermal lining. Thermal lining can be great for cold water to provide you with better warmth.
If you opt for a lining, it is important to know that the wetsuit may have a certain area lined with a thermal lining such as the neck, front, legs and torso or fully lined. But the price will definitely increase with thermal lining. Also, know that not all wetsuits have a lining.
RELATED: How To Dry A Wetsuit
The Bottom Line On How To Choose A Wetsuit
That’s how to choose a wetsuit the right way. Consider the thickness, temperature of the water you are entering, sizing, entry system, seams and thermal. However, you may need to spend more if you are looking to get all the great features in your wetsuit but you will surely reap the benefits.


